
INJECTION MOLDING WITH 3D PRINTED MOLDS
WHEN DOES IT MAKE SENSE?
- When it is early stages of product development where the design changes frequently or very low sample volume production is needed (i.e., 100 parts).
- When there are requirements for precision, repeatability, better physical and thermal part properties than the 3D printed parts.
- To eliminate secondary operations commonly experienced in 3D printing.
POTENTIAL PARTS:
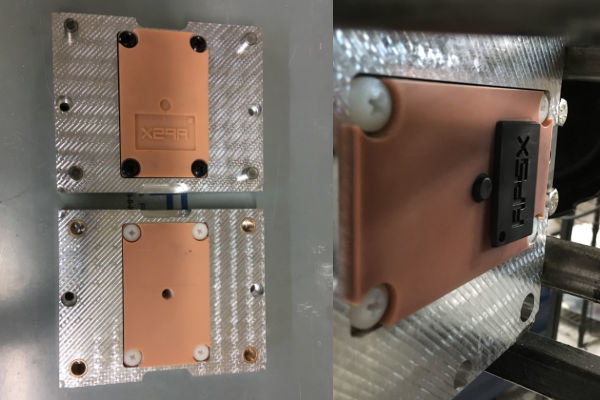
- Eyeglass frame
- Shaft bushing
- Mask strap
- Shield clip
- Golf ball markers and tees
- Small miniature toys
INTRODUCTION
The use of 3D printed molds in injection molding has gained traction as an innovative approach for rapid prototyping and small-batch production. Compared to traditional metal molds, 3D printed molds provide a cost-effective and flexible solution, enabling manufacturers and designers to quickly test and iterate product designs.
ADVANTAGES OF 3D PRINTED MOLDS
1. Cost Efficiency
Traditional mold-making requires expensive tooling and machining, making small production runs prohibitively costly. 3D printing allows for significantly lower costs, especially for prototypes and low-volume production, eliminating the need for expensive metal tooling.
2. Rapid Prototyping
With 3D printing, molds can be created in a matter of hours or days rather than weeks. This enables faster design validation and iteration, shortening the overall product development cycle.
3. Design Flexibility
Unlike conventional mold-making, which has geometric constraints, 3D printed molds allow for intricate and complex designs. This makes them ideal for producing custom and highly detailed parts.
4. Accessibility
Many businesses and individuals can now access 3D printing technologies at a fraction of the cost of traditional manufacturing, opening up new opportunities for small-scale production and niche markets.
The 3D printed mold can make the product development process little bit faster and reduce the initial costs compared to 3D printing. Plus, it improves the product quality with functional prototypes.
However, you may still need to use CNC machining or hand sanding to prepare the 3D printed mold. The mold pairs need to align perfectly during the clamping stage. Due to surface imperfections, the secondary operations may be required. If you need holes smaller than 0.5mm on the mold that would also require a secondary operation. In small mold sizes (6" by 4.8"), there is not much cost difference between a 3D printed mold and a CNC machined aluminum mold
LIMITATIONS
While 3D printed molds offer numerous benefits, they also have some drawbacks that should be considered:
Durability Concerns: 3D printed molds may degrade faster than metal molds, especially under high injection pressures and temperatures.
Surface Finish: Parts molded from 3D printed molds may require post-processing to achieve the desired surface quality.
Production Volume: Best suited for small production runs; high-volume manufacturing still favors traditional molds due to longevity concerns.
Material Compatibility: Some plastics, such as high-temperature thermoplastics, may not be suitable for 3D printed molds due to heat resistance limitations.
REQUIRED EQUIPMENT
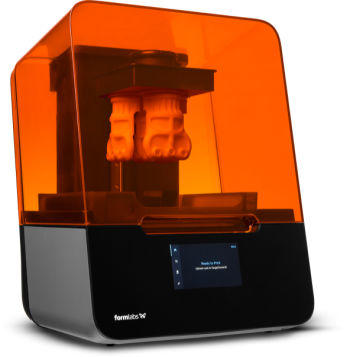
SLA 3D Printer:
SLA printers are a better choice compared to FDM. Smoother surface finish and higher precision. Chemically bonded, dense and isotropic. You can create surface finish texture-out of the SLA printing. The Form 3 from Formlab can be a good option to use.
MATERIALS SUITABLE FOR 3D PRINTED MOLDS
Choosing the right material for 3D printed molds is crucial for achieving optimal results in injection molding. Some common options include:
High-Performance Resins (e.g., Formlabs Rigid 10K, Tough 2000) – Provide durability and high heat resistance, making them suitable for limited production runs.
Engineering-Grade Plastics (e.g., Nylon, Polycarbonate) – Offer increased strength and wear resistance for extended mold life.
Metal-Infused Polymers – Provide enhanced thermal conductivity and durability, improving mold longevity and cooling efficiency.
IINJECTION MOLDING MACHINE:
To get good and consistent parts, the injection molding machine should have precise process control for the injection pressure, plastic temperature, and clamp force. The APSX-PIM injection machine provides the best value for injection molding with 3D printed molds. The precision and the pricing are hard to match.

PROCESS STEPS
Mold Design:
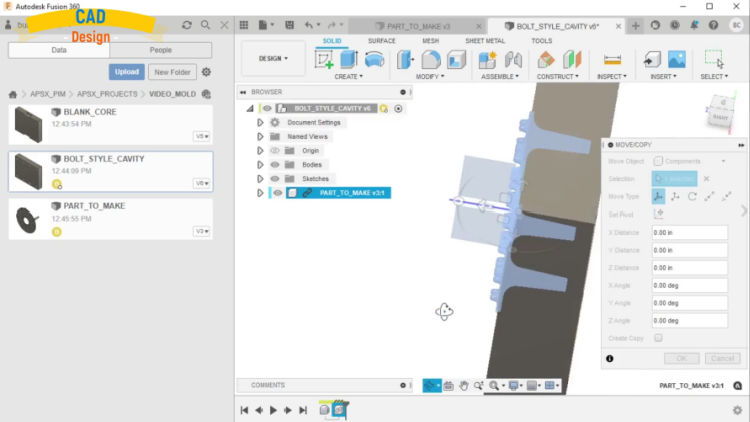
Any CAD software is ok to use to design the 3D printed mold. There is a guideline available on our website. Follow these additional guidelines below:
Add 2-5 degrees draft angle, air vents (0.05mm) and use larger gates.
Design one side flat and other side carrying the design to eliminate the misalignment risk.
Have walls greater than 1-2mm and features larger than 0.5mm.
3D Printing:
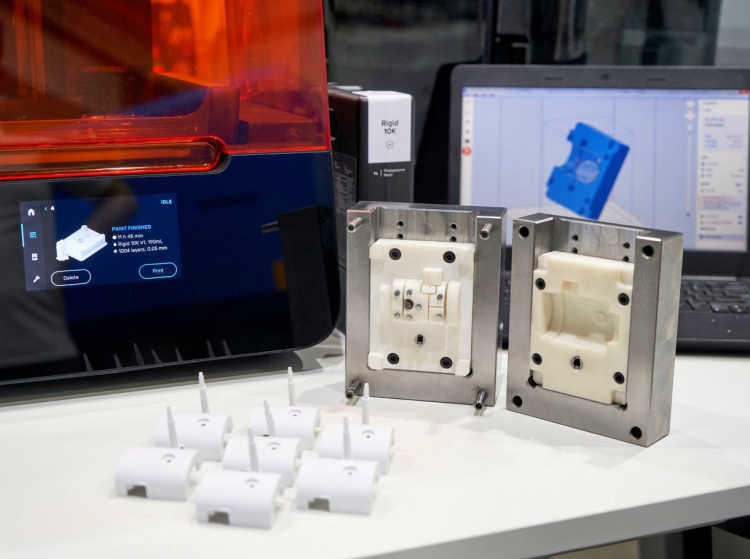
It is suggested using an SLA type 3D printer:
The material needs to withstand clamping, injection pressure, and high temperatures. There are available options in the market for the 3D printed material:
Formlab has Rigid 10K or High Melt. Asiga has FusionGray. Markforged has Onyx.
Printing in 50-micron layer is a good approach.
Preparing the mold, including the "post-curing" process. Typically a CNC machining or hand sanding operation is required after the 3D printing.
Larger the mold size, the more difficult it is to process for injection molding.
Mold Installation:
There are benefits to use a aluminum mold holder (MUD) along with the 3D printed molds:
It adds stability to the 3D printed mold.
It increases the life of the 3D printed mold by helping it to cool faster.
Injection Molding:
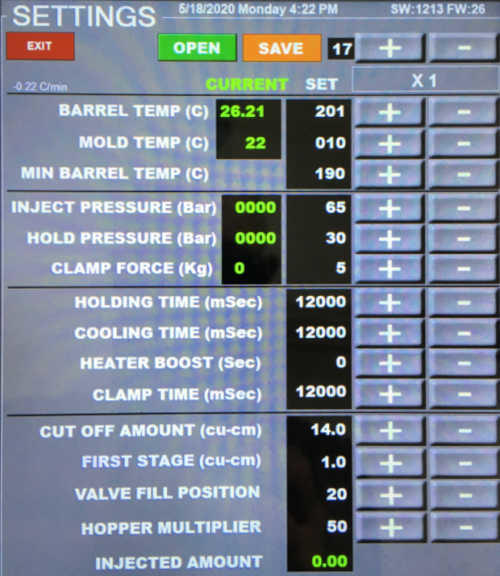
The suggested settings for the PP material can found in the picture above. Guidlines below for some injected material and injection parameters: high melt flow rate is better - injecting PP or TPE are the best options
- Material | Temperature | Injection pressure | Cycle time | Mold life
- PP | 220C | 100BAR | 150sec 100cycles
- HDPE | 225C | 150BAR | 120sec | 100cycles
- ABS | 220C | 95BAR | 160sec | 60cycles
- PC/ABS | 240C | 95BAR | 160sec | 60cycles
- Delrin (POM) | 180C | 150BAR | 120sec | 60cycles
- Nylon | 260C | 80BAR | 120sec | 50cycles
The mold life is a function of the part design, injection material, and molding parameters.
The part design includes the wall thickness and part volume. Thin walls and large part volume requires higher pressures and clamping. There may be cracks on the mold corners and detailed part features.
Injection material determines the flow rate and processing temperature. Lower flow rate and high processing temperatures increase the required temperature. The mold material becomes very brittle quickly if you do not allow long enough cooling time in between cycles.
The need for a silicone release agent (Sprayon or Slide brands) for sticky materials such as TPU and Polycarbonate (PC) may damage the mold.
Air Cooling:
Using an aluminum mold holder (MUD) increases the life of the 3D printed mold by helping it to cool faster. APSX-PIM offers one and uses a variable speed fan for cooling the mold.
Part Ejection:
Using a large draft angle (2-5 degrees) helps pull the part out of the mold at the end of the injection cycle. As an option, an ejector mechanism can be added to the mold for automatic injection molding cycle mode. Since the mold life is not too long, adding additional costs for the ejector pins may not make sense.
Best Practices for Using 3D Printed Molds
To maximize the effectiveness of 3D printed molds, follow these best practices:
Optimize Mold Design: Ensure adequate wall thickness, reinforcement, and draft angles for improved durability and easier part ejection.
Enhance Surface Finish: Sanding, polishing, or applying coatings can improve mold longevity and part quality.
Regulate Injection Parameters: Use lower injection pressures and temperatures to extend mold lifespan and prevent deformation.
Incorporate Cooling Features: If possible, integrate cooling channels or use heat-resistant materials to enhance mold performance.
Test and Iterate: Conduct trial runs and refine mold designs as necessary to achieve the best results.
Conclusion
3D printed molds offer a compelling alternative for injection molding applications, particularly for prototyping and low-volume production. While they are not a direct replacement for metal molds in high-volume manufacturing, they provide an affordable, flexible, and efficient solution for product development. By understanding their advantages, limitations, and best practices, businesses and designers can leverage 3D printed molds to innovate and streamline their manufacturing processes.