How to design a part (CAD) for CNC lathe
 |
| -Click to Go Back |
If you’re new to Fusion 360, please start by checking out these resources below.
Autodesk Fusion 360: Autodesk Fusion 360 Tutorials
NYC CNC: NYC CNC’s How to learn CNC machining:
G-Code Tutor: G-Code Tutor Courses
These videos below are specifically made for CNC lathes. But they will give you a basic idea about how to design a part in Fusion 360.
Autodesk Fusion 360: Tutorial: Fusion 360 Creating Turning Toolpaths
NYC CNC’s Fusion Fridays: John is great in teaching. Fusion 360 Lathe CAD. Fusion Friday #17
G-Code Tutor: A lesson from the course Fusion 360 for CNC lathes
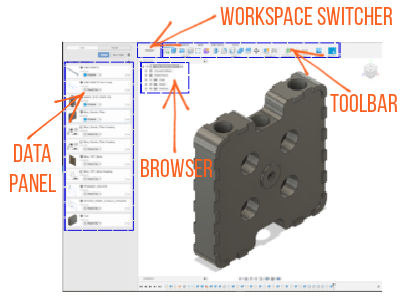
- The Data Panel is where you manage your projects and data. You can create new projects, share them with other users, upload models and other data.
- The Workspace Switcher allows you to toggle between all the workspaces Fusion 360 has to offer. Click the Workspace button at the top left corner, and select the workspace you’d like to switch. This button is labeled with the name of the current workspace (Design, Render, Animation, Manufacture, etc.) and will update once you switch workspaces.
- The Browser is where all your work for a specific project will be saved. Every time you create a new feature or toolpath, a new entry will be added to your Browser. To edit, right-click and select edit.
- The Toolbar is where you’ll find the design tools you can work with within the Fusion 360.
CAD model step by step
- Create a sketch in the design workspace
- Click on Create Sketch icon. Click on the XY plane since the tool comes down from the z-axis. Create the geometry by using the sketch tools such as lines and curves. Finalize the dimensions.
- Click on the Solid tab and select the Extrude icon to create the 3rd dimension on your part.
- Add the holes and fillets on the edges to finalize the details.