A user guide for the injection molding process settings on APSX-PIM
 |
| -Click to Go Back |
APSX-PIM User Screen and Injection Molding Parameters
The machine performs the injection molding functions of plasticizing, clamping, injection, and ejection accordingly and completes the job as set by the user. These automatic steps below are for one single injection cycle.

The user interface is connected to the machine via the USB cable. There are three sections on the user interface: The main dashboard, the manual controls and the settings.

MAIN DASHBOARD
The dashboard has a status message display on top. It shows the current injection cycle step and also notifies the user when necessary.
- STAND BY: Ready for the operation command.
- CLAMPING: Clamp block (2 & 3) is approaching the mold area. Be cautious.
- INJECTING: The nozzle opens, and the plastic is injected into the mold cavity.
- HOLDING: The injection pressure drops to the holding pressure to secure a 100% fill rate.
- COOLING: The machine is waiting for the injected plastic to cool down.
- HOMING: Clamp and injection travel back to their home locations for the next injection cycle.
The status display also shows the cycle timer in seconds. The number on the bottom right corner shows the cycle count until you reset by pressing on it.
SYSTEM button: It turns ON or OFF the system components such as motors and sensors.
HEAT button: It turns ON or OFF the heaters on the barrel. The nozzle heaters are always ON unless the ENABLE NOZZLE HEATER checkbox is not checked. If there is a need to lower the barrel temperature to less than 100C, the checkbox ENABLE LOW TEMP should be checked. If you do not need to use the fan for cooling, please uncheck the ENABLE FAn checkbox.
If the machine is idle for 5 minutes, all heaters are turned off to prevent the degradation of plastic inside the barrel.
TEMPERATURE display: The current temperature of the plastic in the barrel.
RUN button: The button to start or stop the injection cycle.
SINGLE cycle mode: The machine stops and waits when it completes one cycle. To start the next cycle, you need to press the RUN button again.
MULTI cycle mode: The machine does not stop at the end of a cycle. It fills the barrel and moves on to the next cycle. It should be used only with a mold with an ejector system.

APSX-PIM Manual Controls
They are to control the machine motors manually. They can be used when installing a mold or for testing the machine motors. To stop the motors, please use the HALT button.
Injection controls:
- HOME INJECTION: Sends the injection side back to its home location. The machine should be homed before pressing the RUN button.
- INJECTION PRESSURE: Starts the injection motor to generate the injection pressure up to the set pressure - DO NOT USE IT UNTIL THE BARREL TEMPERATURE REACHES TO SET VALUE.
- HOLD PRESSURE: Moves the injection pressure to the hold pressure set by the user - DO NOT USE IT UNTIL THE BARREL TEMPERATURE REACHES TO SET VALUE.
Hopper controls:
- RUN HOPPER: Pushes the plastic pellets to the barrel - DO NOT USE IT UNTIL THE BARREL TEMPERATURE REACHES TO SET VALUE.
- STOP HOPPER: Stops the hopper motor.
Nozzle valve controls:
- OPEN VALVE: Starts the valve motor to open the nozzle valve 100% to let the under-pressure hot plastic flow into the mold cavity - DO NOT USE IT UNTIL THE BARREL TEMPERATURE REACHES TO SET VALUE.
- CLOSE VALVE: Closes the nozzle valve.
Clamp controls:
- HOME CLAMP: Moves the clamp mechanism back to its home base where the clamp switch is set. There are SLOW and FAST modes. The machine should be homed before pressing the RUN button.
- ENGAGE CLAMP: Starts the clamp motor for clamping action. There are SLOW and FAST modes. The final clamping action occurs in SLOW mode.
HALT: It stops on all motors during the manual control actions. It stops the entire injection cycle and homes clamp and injection motors in injection cycle mode (RUN).
E-STOP button on the control panel: Turns off all motors, shuts down the system and disables the heat.

APSX-PIM Settings
The settings section has several controls to optimize the injection cycle for each mold installed and plastic type used.
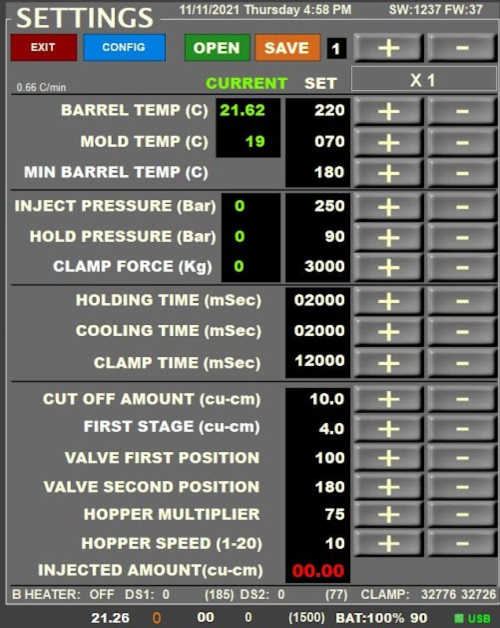
SAVE: Once the parameters are optimized, press this button to store the settings for the profile number shown next to it. The picture below shows the settings for profile number 1. You can change the profile number by using the plus (+) and negative (-) sign buttons.
OPEN: Press this button to recall a specific settings profile number.
EXIT: Press this button to exit from the application.
CONFIG: You can control settings behind the scene, such as fast clamp speed, clamp calibration etc.
X1/X10 button: You can change the parameters by using the + and - buttons in small increments when in X1 mode. In X10 mode, the parameters can be changed in larger increments.

TEMPERATURES
BARREL TEMPERATURE: The current and the set temperatures of the barrel in Celsius. It is suggested to set for plastic's processing temperature.
MOLD TEMPERATURE: The current and the set temperatures of the mold in Celsius. The mold can be kept at about 50C at room temperature by using the existing variable speed fan system.
MINIMUM TEMPERATURE: If the barrel temperature drops below this minimum temperature, it will wait to reach that temperature before running. It should be set at least higher than the material's melt temperature.
.
INJECTION PRESSURE and CLAMP FORCE
INJECTION PRESSURE: The current and the set pressures applied to the plastic inside the barrel in BAR. It is suggested to follow plastic's prospectus.
HOLD PRESSURE: The current and the set holding pressures applied to the plastic inside the barrel in BAR. The rest of the part will be injected (packed) to complete the final details at this pressure.
CLAMP FORCE: The current and set clamp force in Kgs are applied to the mold when fully clamped.
.
TIMES
HOLDING TIME: The time in msec set to keep the mold at the holding pressure. In the end, the nozzle valve closes.
COOLING TIME: The time in msec set to keep the plastic in the mold after the nozzle valve is closed. After this, the homing stage starts.
CLAMP TIME: The machine clamp mechanism moves towards the mold at a certain speed then switches to a slower speed when it gets about 1/8 inches to the mold to complete the clamping at that slow speed. The clamp time is the travel time in milliseconds of the clamp side at a faster speed. Depending on the clamp switch position and the mold thickness, the clamp time needs to be adjusted for a proper clamping procedure. If it is too high, the clamping occurs at a fast speed and may not be accurate. If it is too low, the clamping travel takes too much time since it moves at a slow speed, too long to reach the mold and the cycle may be aborted.
.
PART CHARACTERISTICS
CUT-OFF AMOUNT: The amount in cu-cm that the machine closes that valve and stops injection. It can be used as a safety measure. Typically, it can be 1.5 times the part volume.
FIRST STAGE: The initial stage of the injection process. APSX recommends this number be set at 40% of the total part volume. For example, if your total part volume, including the sprue, is 10cu-cm, then set the first stage to 4cu-cm.
VALVE FIRST POSITION: The machine opens the nozzle valve for the first position when both the clamping and the set injection pressure are completed and achieved. It controls the angle of the nozzle pin - 200 max value means 90 degrees (fully) open.
VALVE SECOND POSITION: The nozzle valve switches to the second position when the first stage amount is reached. At that moment, the injection pressure switches to holding pressure and stays there until holding time is expired.
HOPPER MULTIPLIER: Increase the hopper multiplier value if the barrel is not filled enough after each cycle. If the discharge hole on the barrel discharges too much plastic out, decrease the hopper multiplier value.
HOPPER SPEED: It controls how fast the hopper motor turns. You can adjust this when you use different types of plastics until you get a good fill rate.
.
